Tuesday, June 3, 2014
Result and Conclusion
Result
The
detection of various materials living or dead is done. Using Logitech C270
webcam and codes with OpenCV library functions, certain day-to-day life
activities can be tracked and reproduced in the form of required outputs. Face
detection and tracking, movement detection and tracking are the functions that
can be executed efficiently and have been executed with almost 70% efficiency
w.r.t. time delay.
Using
Microsoft Xbox 360 Sensor, more detailed tasks can be carried out that works
efficiently in terms of time delay. Using Microsoft Xbox 360 Sensor, it uses
three different cameras viz. RGB, IR and Depth cameras. Using these all
together and running basic functions, many tasks can be carried out. The task
of head pose estimation, face detection and tracking etc can be carried out
effectively. Apart from that depth detection, distance measurement, use of
camera during less light, object detection and tracking as well as motion
detection can be carried out. Microsoft Xbox 360 sensor also has inbuilt
microphone which is direction based and helps in detection any object or person
based on the detection of type of sound. Also it helps the blind person in the
proper detection of a person as well as store the same.
The
other functions include the detection of text to speech and vice versa. Also
detection of hand written letters into speech. Here the hand written letters
will be compared with inbuilt letters and numbers and a probable outcome will
be provided which can be turned into a speech form. This is effective as far as
writing is proper and the detection is efficient. Also text to speech helps the
blind person in noting down a person’s name in the directory and can be saved
as a file name.
Object
detection is an advanced form of handwritten to speech detection. Here the
pre-built images will be compared with real time information of the object in
front and will the approximated detected object and its name as well as provide
a sound output.
The
following screenshot shows the final WebcamFaceRec project, including a small
rectangle at the top-right corner highlighting the recognized person. Also
notice the confidence bar that is next to the pre-processed face (a small face
at the top-centre of the rectangle marking the face), which in this case shows
roughly 70 percent confidence that it has recognized the correct person.

Fig R.1: Webcam Face Recognition
Next result is of Text to Speech synthesis
which works very fine. Sound can be listened practically but in this document I
am showing snapshot of program with a text file and terminal line for
execution. This successful implementation of Text to Speech synthesis can be
used in WebCam Face Recognition program where when a face is recognized it can
speak his name with pre-defined words like
“Hey PandaBoard User, XYZ is in front of
you “!

Fig R.2: Text to Speech Synthesis
Now after Face Recognition and Text to
Speech synthesis this project is almost complete but the last hurdle is that we
cannot store faces of each individual and hence need to store new faces or
unknown person coming as and when they come in front of camera. Speech to Text
synthesis was one thought we were having to use when a new person’s face is
detected but there is no Speech to Text software or algorithm developed till
date for Ubuntu operating system and research is going on still. So to do that
work we are thinking out of the box by using Sound Marking.
In sound marking we are going to record
sound of the unknown person coming in front of device that is his/her own voice
containing his name. So for doing this we used a Kinect Sensor and developed an
application which records sound for 5 seconds in which whatever is spoken will
be recorded and will be saved with the name of date and time of that moment. At
the same instant a picture would be captured of unknown person with the same
date and time name off course so that his/her face could be stored. Next time
when that person comes in front of camera his/her face would be detected and we
would get the filename of detected face from which we can play his/her recorded
voice containing his/her name and hence the problem of Unknown faces could be
solved.
We had developed the application of
recording sound for windows whose snapshot is shown in next page but we are yet
to develop the application for Ubuntu OS.

Fig R.3: Audio Recording for Sound Marking
One another application we developed is
Basic Optical Character Recognition in which whatever number is drawn by the
user gets detected by the application with a system error chance of 11.00%.
This could help blind to write something or read something in digital alphabets
and numbers.

Fig R.4: Optical Character Recognition
Conclusion
We have developed a device which can be
used easily by visually impaired community. The size of this device is 4.5 by 4.0 inches with the camera size of 3 x 8.2 x 6 inches
and whole weight is 332 grams. Approximate cost of this device is INR
16000 /-. This device has salient features as
following:
- · Face Detection, Tracking and Person Identity Detection
- · Face Tagging and Storing New Person’s Face
- · Optical Character Recognition: Hand Written Text Recognition
- · Text to Speech
- · Object Detection, Tracking and Tagging
- · Motion Detection and Tracking
- · Capturing an Image using Hand Gesture and Uploading it to Internet
- · Colour Detection and Generation of Different Audio for Different Colours
- · Sound Marking for saving new faces and name
Nothing is perfect so there are always
chance of improvement and hence following are the future work which can be done
in this project:
- · Integrating Face Recognition , Text to Speech synthesis and Sound Marking in a single application
- · Developing Speech to text Synthesis
- · Improving Number and Character Recognition accuracy
- · Increasing speed of Video Frame for processing
- · Loading PandaBoard with only needed applications and softwares
- · Working without Operating System , example using PUTTY
Utility of Algorithms
1 Face recognition
and Face detection
Face
recognition is the process of putting a label to a known face. Just like humans
learn to recognize their family, friends and celebrities just by seeing their
face, there are many techniques for a computer to learn to recognize a known
face. These generally involve four main steps:
1. Face detection: It is the process of
locating a face region in an image (a large rectangle near the centre of the
following screenshot). This step does not care who the person is, just that it
is a human face.
2. Face pre-processing: It is the process of
adjusting the face image to look more clear and similar to other faces (a small
grayscale face in the top-centre of the following screenshot).
3. Collect and learn faces: It is the process of saving
many pre-processed faces (for each person that should be recognized), and then
learning how to recognize them.
4. Face recognition: It is the process that
checks which of the collected people are most similar to the face in the camera
(a small rectangle on the top-right of the following screenshot).
Step 1: Face detection
Detecting an object using the Haar or LBP Classifier
After
loading the classifier (just once during initialization), we can use it to detect
faces in each new camera frame. But first we should do some initial processing of
the camera image just for face detection, by performing the following steps:
1. Grayscale colour conversion: Face
detection only works on grayscale images. So we should convert the colour
camera frame to grayscale.
2. Shrinking the camera image: The speed
of face detection depends on the size of the input image (it is very slow for
large images but fast for small images), and yet detection is still fairly
reliable even at low resolutions. So we should shrink the camera image to a
more reasonable
3. Histogram equalization: Face detection
is not as reliable in low-light conditions. So we should perform histogram
equalization to improve the contrast and brightness
Step 2: Face pre-processing
Eye
detection can be very useful for face pre-processing, because for frontal faces
you can always assume a person's eyes should be horizontal and on opposite
locations of the face and should have a fairly standard position and size
within a face, despite changes in facial expressions, lighting conditions,
camera properties, distance to camera, and so on. It is also useful to discard
false positives when the face detector says it has detected a face and it is
actually something else. It is rare that the face detector and two eye detectors
will all be fooled at the same time, so if you only process images with a
detected face and two detected eyes then it will not have many false positives
(but will also give fewer faces for processing, as the eye detector will not
work as often as the face detector).
Step 3: Collecting faces and learning from them
This
is referred to as the training phase and the collected faces are referred to as
the training set. After the face recognition algorithm has finished training,
you could then save the generated knowledge to a file or memory and later use
it to recognize which person is seen in front of the camera. This is referred
to as the testing phase. If you used it directly from a camera input then the pre-processed
face would be referred to as the test image, and if you tested with many images
(such as from a folder of image files), it would be referred to as the testing
set.
Step 4: Face recognition
The final step of face recognition involves work of
identification and verification of faces. In Face identification the task is to
recognizing people from their face and in face verification the task is to
validate that it is the claimed person.
2 Text to
Speech Synthesis
Festival is a general multi-lingual speech synthesis system developed at CSTR (Centre
for Speech Technology Research). Festival offers a general framework for
building speech synthesis systems as well as including examples of various
modules. As a whole it offers full text to speech through a number APIs: from
shell level, though a Scheme command interpreter, as a C++ library, from Java,
and an Emacs interface. Festival is multi-lingual (currently British English,
American English, and Spanish.)
Installation
Install Festival by typing the
following command in a Terminal:
1.
sudo apt-get install festival
Note: Additional voices are available in the
Ubuntu repositories. Type "festvox" in Synaptic Package Manager for a list of language packages.
2.
sudo apt-get
install festival-dev
Note: Festival-dev is required for source libraries and programming in
C/C++


Fig 1. Festival
and Festival-Dev installation
Configuration for ESD or PulseAudio
If you want festival to always use
ESD or PulseAudio for output, you can configure this
globally, for all users, or on a per-user basis. To configure globally use the
configuration file /etc/festival.scm. To configure locally use the
configuration file ~/.festivalrc.
1. Open
the configuration file by typing gksudo gedit /etc/festival.scm or gedit ~/.festivalrc in a terminal.
2. Add the following lines at the end of the
file:
(Parameter.set 'Audio_Method 'esdaudio)
3. Save the file.
This is the recommended method for
playing audio in Ubuntu.
Configuration for ALSA
Note: It is hard to use ALSA and ESD on the
same system, if it is possible at all. Here it is assumed that you are using
ALSA instead
of ESD.
Insert at the end of the file /etc/festival.scm or ~/.festivalrc the lines
(Parameter.set 'Audio_Command "aplay -D plug:dmix -q -c 1 -t raw -f s16 -r $SR $FILE")
(Parameter.set 'Audio_Method 'Audio_Command)
(Parameter.set 'Audio_Required_Format 'snd)
On some configurations it may be
necessary to remove the "-D plug:dmix" part of the aplay command
above.
Testing
Test your setup by typing in a
Terminal
1. festival
You will be presented with a > prompt. Type
1. (SayText "Hello")
The computer should say
"hello".
To listen to a text file named FILENAME, type
1. (tts "FILENAME" nil)
Note FILENAME must be in quote marks.

Fig 2: Testing Festival
In order to use Festival you must
include `festival/src/include/festival.h' which in turn will include
the necessary other include files
in `festival/src/include' and `speech_tools/include' you
should ensure these are included in the include path for you your program. Also
you will need to link your program
with `festival/src/lib/libFestival.a', `speech_tools/lib/libestools.a',`speech_tools/lib/libestbase.a' and `speech_tools/lib/libeststring.a' as
well as any other optional libraries such as net audio.
The main external functions available for C++ users
of Festival are.
void
festival_initialize(int load_init_files,int heapsize);
This
must be called before any other festival functions may be called. It sets up
the synthesizer system. The first argument if true, causes the system set up
files to be loaded (which is normallly what is necessary), the second argument
is the initial size of the Scheme heap, this should normally be 210000 unless
you envisage processing very large Lisp structures.
int festival_say_file(const
EST_String &filename);
Say
the contents of the given file.
Returns TRUE or FALSE depending on where this was
successful.
int festival_say_text(const
EST_String &text);
Say
the contents of the given string.
Returns TRUE or FALSE depending on where this was
successful.
int
festival_load_file(const EST_String &filename);
Load
the contents of the given file and evaluate its contents as Lisp commands.
Returns TRUE or FALSE depending on where this was
successful.
int
festival_eval_command(const EST_String &expr);
Read
the given string as a Lisp command and evaluate it.
Returns TRUE or FALSE depending on where this was
successful.
int
festival_text_to_wave(const EST_String &text,EST_Wave &wave);
Synthesize
the given string into the given wave. Returns TRUE or FALSE depending
on where this was successful.
3 Sound
Marking
Sound
marking is used for recording a sound and saving it with the time and date of
that instant such that it can be used with an image of same name and the
recognized face name can be spoken. We are doing this in Windows with help of
Kinect and we are trying to do the same with Ubuntu but currently we are
getting success in Windows only. We are using Kinect Developer Toolkit whose
latest version is 1.8 and includes several applications of use for Kinect
Sensor. One of such application is Audio Capture Raw Console. We had changed
some parts of this application as per our need and getting successful result of
capturing audio for 5 seconds and then saving it with date and time as its
name.
The Audio Capture Raw-Console C++ sample in the Developer Toolkit does
not use the KinectAudio DirectX Media Object (DMO) to access the Kinect audio
stream, but uses the underlying Windows Audio Session API (WASAPI) to capture
the raw audio stream from the microphone array. This approach is substantially
more complex than using the KinectAudio DMO, but will be useful for developers
familiar with the capabilities of Windows Audio Session programming. This
topic, and its subtopics, are a walkthrough of this sample.
Program
Description
Project Files
The Audio Capture Raw-Console sample
is a C++ console application that is implemented in the following files:
- AudioCaptureRaw.cpp
contains the application's entry point and manages overall program
execution.
- WASAPICapture.cpp
and its associated header (WASAPICapture.h) implement the CWASAPICapture
class, which handles the details of capturing the audio stream.
- ResamplerUtil.cpp
and its associated header (ResamplerUtil.h) implement a resampler class
that takes that takes the mix format (IAudioClient::GetMixFormat) -- a
WAVE_FORMAT_EXTENSIBLE structure -- and converts it to a WAVE_FORMAT_PCM.
It does not change the sampling rate or the number of channels, but with
small modifications this can be done as well if needed. It does change the
PCM format from 32-bit float to 32-bit signed integer.
Program Flow
The Audio Capture Raw-Console basic
program flow is:
- Enumerate
the attached Kinect sensors and establish a connection to the first
active, unused sensor.
- Set
up the audio connection to the sensor.
- Capture
and write the audio data to the capture file. The capture file is named
KinectAudio_HH_MM_SS.wav, where HH:MM:SS is the local time at which the
sampling started. This file is placed in your Music directory.
4 Attaching
and Running on Touch Screen
The plug-and-play screen bundle includes:
·
10" glossy screen LCD with IPS
technology, 1280x800 px, 256K (18-bits) colors with
integrated multi-points capacitive touchscreen with USB interface
·
New LVDS board that has all required voltages for LCD,
contains PIC controller that can be programmed to provide EDID information
(like screen resolution, etc) over DDC/I2C interface and also can control LCD
brightness in automatic (with help of ambient light sensor) or manual mode
·
LVDS cable
·
ambient light sensor (can be connected as a part of LVDS
cable to LVDS board) for automatic LCD brightness control
·
Tested to work with: BeagleBoard, BeagleBoard-xM,
PandaBoard, PandaBoard ES
PandaBoard ES and LCD:
·
Below are steps required to get Linux logo on
our 7″ and 10″ LCDs. As usually, Robert Nelson’ Linux image were used. SD card
is detected as /dev/sdb.
·
Commands:
$ wget https://rcn-ee.net/deb/rootfs/wheezy/debian-7.1-console-armhf-2013-08-26.tar.xz
$ tar xJf debian-7.1-console-armhf-2013-08-26.tar.xz
$ cd debian-7.1-console-armhf-2013-08-26
$ sudo ./setup_sdcard.sh --mmc /dev/sdb --uboot bone
$ sync
·
After that update uEnv.txt file on SD card in
partition “boot” to setup correct LCD resolution. The uEnv.txt with all 4
possible combinations have been made (HDMI/cape version of board, 10″ LCD with 1280×800
or 7″ LCD with 1024×600 resolution). File is uploaded here: http://goo.gl/N03vlE
Now the image is done. If everything is OK, you will see Linux logo in 3-4 seconds after start-up.
Now the image is done. If everything is OK, you will see Linux logo in 3-4 seconds after start-up.
·
Update: the trick is to add letter “M” after
resolution in uEnv.txt file – this forces kernel to calculate LCD timings based
on custom resolution.
How to get touchscreen working:
Some Linux distros come with these drivers included in
kernel, others not. If you can’t use touchscreen after Linux is running in X
GUI mode or if you don’t have assigned input device in console mode, then you
should do the following:
1. First of all, check all connections. We had
many cases when customers forgot or incorrectly connected touchscreen to
miniUSB add-on board.
2. Connect just touchscreen through USB cable
to normal PC running Windows. If touchscreen is detected and you can use it in
Windows, then all connections are OK and you can proceed further.
3. If your Linux kernel does not include
drivers for touchscreen, then you should recompile kernel with the following
options:
· for AUO LCD (1024×600 px): “Device Drivers –> HID
Devices –> Special HID drivers –> HID Multitouch panels“,
option name: CONFIG_HID_MULTITOUCH, available in mainline
kernel since version 2.6.38
· for LG LCD (1280×800 px, black frame): “Device Drivers –> HID Devices –> Special HID drivers –>
N-Trig touchscreens“, option name: CONFIG_HID_NTRIG,
available in mainline kernel since version 2.6.31
4. If you run Android, then you can encounter
problem with non-correct touchscreen vs screen resolution. This happen because
Android supposes default screen resolution for external LCD as 720p or 1080p
(touchscreen is connected by USB and is considered as external device), but our
LCD is 1024×600 or 1280×800. You can easy check it by simply turning on option
“Show touches” in Settings->Developer options of Android. Then you will
notice the difference in real position of touch and Android touch position.
This can be easy improved by placing one of below files to /system/usr/idc
folder of Android rootfs. After that touchscreen size and LCD size will match.
File for Ntrig touchscreen (1280×800, black frame)
File for Cando touchscreen (1024×600)
See below links for additional information on touchscreen devices functionality under Android:
Touch devices in Android
Input device configuration files
File for Ntrig touchscreen (1280×800, black frame)
File for Cando touchscreen (1024×600)
See below links for additional information on touchscreen devices functionality under Android:
Touch devices in Android
Input device configuration files
5. You can use console command getevent (sources for Linux are here: getevent.zip)
to check what touchscreen returns when you touch it. Also, you can get more
details about touchscreen and its modes with commands getevent -p and getevent -i.
6. N-trig touchscreen can be tuned with some
parameters:
· min_width – minimum touch contact width to accept
· min_height – minimum touch contact height to accept
· activate_slack – number of touch frames to ignore at the
start of touch input
· deactivate_slack – number of empty frames to ignore before
deactivating touch
· activation_width – width threshold to immediately start
processing touch events
· activation_height – height threshold to immediately start
processing touch events
They
can be changed right from console, see here for details: http://baruch.siach.name/blog/posts/linux_kernel_module_parameters/
How to install and configure Ubuntu for PandaBoard ES:
Below is the simplest instruction of installing and
configuring Debian/Ubuntu with LCD support.
·
Go to https://github.com/RobertCNelson/netinstall, select required distro and proceed with
mk_mmc.sh script. It will automatically download required files and configure
minimal working system on your SD card.
·
Then,
go to “boot” partition of your SD card, find file “uEnv.txt” and change
parameter “dvimode” for 10″ AUO LCD (1024×600) and 7″ CPT LCD (1024×600,
resistive touch):
· "dvimode=1024x600MR-16@60"
or for 10″ LG LCD (1280×800, black frame) and new gen
7″ panels (1280×800, capacitive touch):
· "dvimode=1280x800MR-16@60"
Commands:
Cntrl+Alt+F1 or Cntrl+Alt+F2 and then run the commands in
‘root’ mode.
To run in Terminal mode, apply ‘sudo’ command each time
before any command.

Fig 3: 10” LCD LVDS Bundle
with Capacitive touchscreen and Ambient Light Sensor

Fig 4: Assembled V2 PCB Board
Kinect for Ubuntu
Introduction
Kinect sensor provides raw color image frames from the RGB camera, depth
image frames from the depth camera, and audio data from the microphone array to
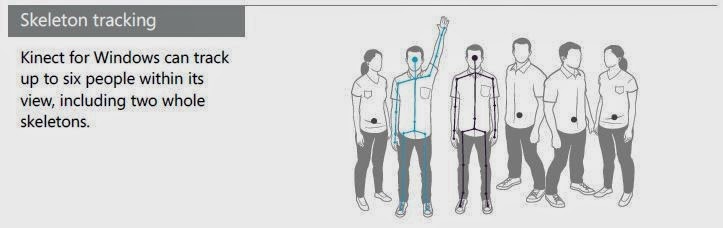
the SDK. Kinect is versatile, and can see people
holistically, not just smaller hand gestures. Six people can be tracked,
including two whole skeletons. The sensor has an RGB (red-green-blue) camera
for color video, and an infrared emitter and camera that measure depth. The
measurements for depth are returned in millimeters. The Kinect sensor enables a
wide variety of interactions, but any sensor has “sweet spots” and limitations.
With this in mind, Kinect team defined its focus and limits as follows:
Physical limits – The actual capabilities of the sensor and what it can
see.
Sweet spots – Areas where people experience optimal interactions, given
that they’ll often have a large range of movement and need to be tracked with
their arms or legs extended.


Kinect is unique because its single sensor captures both voice and gesture, from face tracking and small movements to whole-body. The sensor has four microphones that enable our application to respond to verbal input, in addition to responding to movement.
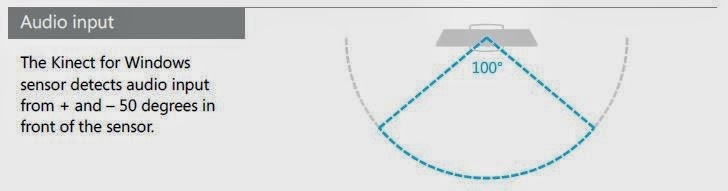
Fig 6.7: Audio Input


Fig 6.11: Loudest source targeting

Fig 6.12: Kinect with its sensor
Installing Kinect in Ubuntu
Quick
copy-paste instructions to get up-and-running instantly:
sudo apt-get
install git-core cmake freeglut3-dev pkg-config build-essential libxmu-dev
libxi-dev libusb-1.0-0-dev
cd libfreenect
mkdir build
cd build
cmake ..
make
sudo make
install
sudo ldconfig
/usr/local/lib64/
sudo glview
To
use Kinect as a non-root user do the following:
sudo adduser
$USER video
Also
make a file with rules for the Linux device manager:
sudo nano
/etc/udev/rules.d/51-kinect.rules
Copy
and paste:
#
ATTR{product}=="Xbox NUI Motor"
SUBSYSTEM=="usb",
ATTR{idVendor}=="045e", ATTR{idProduct}=="02b0", MODE="0666"
#
ATTR{product}=="Xbox NUI Audio"
SUBSYSTEM=="usb",
ATTR{idVendor}=="045e", ATTR{idProduct}=="02ad",
MODE="0666"
#
ATTR{product}=="Xbox NUI Camera"
SUBSYSTEM=="usb",
ATTR{idVendor}=="045e", ATTR{idProduct}=="02ae",
MODE="0666"
#
ATTR{product}=="Xbox NUI Motor"
SUBSYSTEM=="usb",
ATTR{idVendor}=="045e", ATTR{idProduct}=="02c2",
MODE="0666"
#
ATTR{product}=="Xbox NUI Motor"
SUBSYSTEM=="usb",
ATTR{idVendor}=="045e", ATTR{idProduct}=="02be",
MODE="0666"
#
ATTR{product}=="Xbox NUI Motor"
SUBSYSTEM=="usb",
ATTR{idVendor}=="045e", ATTR{idProduct}=="02bf",
MODE="0666"
Be
sure to log out and back in.
If
you can't access or still need root privileges to use your
device: in some cases there might be conflicts between permissions of two
drivers installed (libfreenect and primesense). If this is your case, try
reinstalling primesense's sensor driver and keep only primesense's
rules file /etc/udev/rules.d/55-primesense-usb.rules, removing the
/etc/udev/rules.d/51-kinect.rules file if you created it.
Testing Kinect
in Ubuntu
You need to do this as root (or use sudo) if you did not
follow the "Use as normal user" steps.
$ bin/freenect-glview
or
$ sudo bin/freenect-glview
 Fig 13: Kinect tested in Ubuntu
Subscribe to:
Posts (Atom)